Saturday, June 27, 2009

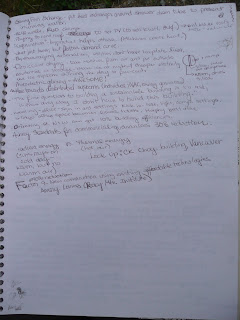
Constructed Wetlands Notes

My constructed wetlands course was one of the best classes that I have ever taken. It was a pretty busy week, but we accomplished quite a bit. The instructors were very thorough - they, in specific detail, gave us directions on how to decide if a wetland is appropriate, how to size it, what levers and pipes to use, what water tests should be run, etc. They gave everyone a CD at the end of the course that had all their powerpoint presentations and charts and references that they used during the class.

I think I will let notes do the speaking for me, as far as specific information goes. If anyone has any questions, feel free to leave a comment. Please don't interpret my lack of writing specific details as not knowing them. This class was amazing and thorough and I feel like I understand all the topics we covered pretty thoroughly. (My weak spot would probably be in water testing, but I understand it, especially with the use of notes.)


(The bottom of this page was filled on a bus ride for a field trip. I wasn't doodling during class.)

(Notes from 10 Stones.)

(Notes from The University of Vermont Research Center.)

(Notes from Teal Farm.)


(Finding dimensions for our wetland.)
(Transit readings.)

(Watch for another entry about our field trip day.)

Thursday, June 25, 2009

Building the Wetland

My Constructed Wetlands class ended yesterday. The entire week whirred by. There will be multiple posts about it. I've been working on this post all week, adding on every day. I haven't been forgetting about you - just haven't come to a good stopping point. Until the class stopped, that is.

The class was officially titled "Constructed Wetlands for Waste water Treatment." So, we constructed a wetland for waste water treatment.

There's already a wetland from last year's class that treats the water from the solar shower. In the "master plan" for Yestermorrow's expansion (new buildings to accommodate more students and classes at one time,) there was a plan for a sink area near the solar shower. So, we decided to expand the water treatment capabilities by adding another wetland.

First, we had to survey the area. I was in charge of keeping track of the measurements. I fell in love with the transit completely. It was hard to get level.

Basically, one person would stand with a ruler-pole, holding it as straight as possible (and wiggling it some. The lowest number read is the right measurement.) The other person peeks through the transit, which zooms enough to read the numbers on the ruler.

After we surveyed our site, we finalized our plan for the placement of the wetland. We chose a place that was sunny, downhill slightly, nearby (just across the path), and not too close to the pine cabin.

For something so organic, the wetland required some precise measuring. We triangulated to make sure that our wetland was perfectly rectangular.

Then, we dug. The top of our wetland (not including the berm) measured 6 by 11 feet. There was a 1:1 slope, so the bottom of our wetland, which was 2 feet deep, was 1 by 6. We had to be careful not to cut out the slope too much, because it's much easier to carve the soil than replace it.)

We got our depth first. The wetland had to be level, and since the ground isn't, we had to make up for the differences. Therefore, our downhill side sticks out much more than the uphill side.

We connected our old wetland to the new wetland. (Also, you can see Barton holding a tape measure. This is because our ruler stick wasn't tall enough.)

We strung a line to help us keep the berm level and at the right height. You can see the slope of the wall shaping up in this picture.

The end of Day 1.

We wanted to divert the water that came off the pine cabin. Instead of letting it flow into the wetland (which would push the waste water through the wetland too fast) we dug a trench.

Kendall came and gave our class a tutorial on stop dams.

Kendall had built some stop dams the day before. The idea is that the dams slow down the water to keep it from eroding the path. We wanted to implement this idea in our trench.

So we built our own miniature dams. Theoretically, they will divert the water downhill and away from our wetland.

In the above picture, Pete, one of the instructors, is tamping the sides of the wetland. He got the sharp rocks out of the way, ready for the liner.

We put down a protective barrier.

Our waterproof liner was 10 by 15, a dimension that we had to keep in mind when digging our hole. Shoes weren't allowed on top of the liner.

We had to cut a couple holes in the liner for the inlet and outlet pipes. It was a fairly nerve-wracking process.

Our outlet pipe, perforated.

We set another protective barrier on top of the liner and started filling the wetland with gravel. We used large (3-6 inch) gravel at the top and bottom (to prevent any sediment build-up.)

We filled the rest of the wetland with 3/4 inch gravel. At the inlet, we placed a half pipe. This prevents rocks from getting too close to the inlet and clogging it. It also lets the water spread out freely. We installed our clean-out pipes (for pumping out any kind of sediment that might ever possibly build up at the entrance - the most likely place for sediment to clog.)

The top layer of gravel is pea gravel, to prevent organic materials from falling into and incorporating itself into the wetland. Here, Pete plants the first wetland plant. We picked plants from around campus, especially around water sources and the septic drain field. These plants have deep roots, and will grow until they are submerged in their water source. We'll keep the water level high for the first couple of weeks, then lower it (using a control in the sump pump) so that the plants stretch. A little later, we'll lower the level again so the roots get even deeper. Then, we raise the water level to operating height.

All the plants, with the finished rock wall. (And Barton, the other instructor.)

The sump pump was made of an old shop-vac with a grill lid for a cap. The shop vac was covered with the rock wall, but the grill lid was still visible, so we decided to paint an interpretive sign on it. This is the sketch for the sign, which explains the water process in the wetlands. (Shower, first wetland, second wetland, drain field.)

Many people worked on the lid. We would paint for a bit (with very limited colors) and then pick up the lid and rotate it, so we'd be working in a different spot that someone else started. It was an amazing artistic process. It was a lot of fun.

And the lid ended up looking pretty good. (This is a bad shot of it - you can't see any of the actual detail around the bottom. It looks great though, I promise.)

The Constructed Wetlands class and instructors, with our finished wetland.

Sunday, June 21, 2009

Office Duty

This weekend, I had office duty. Common intern thing. I've been checking people in for their classes, cleaned the chicken coop, answered the phone (many times), cleaned the lobby, organized the "YesterMarket," cleaned the bathroom, gave a tour to a perspective student and fixed the printer. Somewhat uneventful, but necessary.

It's interesting to sit in the middle of things. You get to see and talk to everyone, and they tell you all about their class. Apparently, one of the courses that is ending today wasn't all that wonderful - "Redesigning Waste Water." The instructors were focused on large-scale waste water treatment instead of home-scaled. For a weekend class, I heard, they spent too much time talking about non-applicable topics. I start a week-long class this evening with these same instructors - "Constructed Wetlands for Waste Water Treatment." Hoping for the best.

My classmates are arriving. They seem friendly. Everyone around here is friendly.

Green Development Best Practices Summary

Wednesday, Thursday and Friday, I was busy all day taking Green Development Best Practices. The instructor, Ed Lowans, consults with green developers, focusing on practicality and feasibility. He was incredibly knowledgeable and could talk miles about any subject. At times, this was great. At others, it was a little too much for me. I haven't had experience with some of the more technical systems of a building, so spending hours talking about HVAC (heating, ventilation and air conditioning) systems was completely unentertaining. However, we had some great discussions, I took a ton of notes and copied some of his presentation materials (word documents with specific system information and powerpoints) for my own future use.

Since there was SO much information on a variety of different topics concerning "green" systems within a building, I think it would be best to pull out some major points of interest and rely on my notes for more details.


Things I found particularly interesting/useful:
  • There are two major energy performance rating guides in the US and Canada. EnergyStar ratings mark the top 25% most efficient appliances. Energuild, a Canada-based rating system, labels each appliance with a kWh/year (with typical use.) Both systems have their advantages, but I had never heard of Energuide and I like being able to compare very specifically.
  • LEED is a pretty crappy way to rate a building's efficiency. LEED works on a point system. Small improvements receive the same number of points as larger, vital design issues. Also, LEED is entirely impersonal. Not all "green improvements" work with every building - sometimes, they might make the building less efficient. For example, while LEED specifies that folks should use efficient light bulbs, they don't mention spacing or maintenance of lights, so lights are often placed inefficiently. So while LEED is generally a step in the right direction, it's not perfect by any means. A similar program, ASHRAE, provides a list of specific technologies (specifically what HVAC systems) to install so that if a builder includes the items on the checklist, they should have at least a 30% reduction in energy usage.
  • The efficiency of a house depends greatly on the occupants. As soon as a house is handed over from designer to occupant, "leakage" begins - efficiency drops. That's because occupants are not always included in the planning process and don't use the buildings specifically how they are designed. I think that the solution to this would be to plan buildings together - an integrated design process. (The architect, engineer and building owners should all be involved in this process.) The occupants should know all the inner workings of the building, understanding exactly why each system was chosen. Education is the key here. Education and patience.
  • Ed spoke a bit about "smart systems." I tend to gravitate towards lower-technology buildings, but, if one is producing their own electricity, a smart system is a completely valid way to go. Heating and cooling systems can be "trained" to self-regulate.
  • It is entirely possible and sensical to heat water underneath PV panels. It's not quite as effective as a straight-up solar water heater, but it gives a nice boost to the water-heating system.
  • The average building has a 50 year lifespan. This is not because it fails, but because it becomes obsolete.
  • Pyrolysis is an awesome concept. If you burn organic matter in a 45 gallon drum, catch the released gasses, cycle them back through the system, burning them, you end up with very little/no emissions and a pile of coal, which is caught carbon that can be put back into the earth. It's a carbon-negative cycle. An interesting, quickly found article/video can be found here. One of the fellows in my class (who was also in the core class, so I've gotten to know him pretty well) is working in Belize on a pyrolysis (aka "Biochar") system. His site is here. He can't get any funding to further develop the system, even though it's a carbon-negative system.
  • We spoke about windows quite a bit. The best windows have multiple panes of glass, different glazings on the glass to treat the light, and are filled with krypton, argon or air (in order of insulation value.) They can be tilted to reduce or increase the amount of heat allowed in.
  • A well insulated house should have at least R40 walls and R60 cielings. (I already knew this. Was just throwing it out there because it is pretty important.)
  • "The first question to building a sustainable building is to ask, 'is there any way I don't have to build this building?'" - Ed. I've really adopted this mindset over the last year or so. I think a building needs a purpose, and retrofitting can be far better than building.
  • The term "Factor 9" came up quite a bit over the three days. Factor 9 refers to a 90% reduction in energy usage. Right now, it's entirely possible to build a Factor 9 building using existing, affordable technologies.
  • Radient energy and thermal energy are interestingly different. Radient is like the sun's rays on a cold day. The air isn't warm, but you can feel toasty from sitting in the sunlight. Thermal energy would refer to warm air.
  • We spoke about materials to be used in buildings based on their life-cycles. The first life cycle of a material is focused on embodied energy - how much went into extracting or producing the material. The second life cycle asks how much of the material can be recycled or reused. Wood can be reused to an extent, but not too much. Virtually 100% of steel can be reused. Concrete can only really be used for road construction stuff. The third life cycle is just a step farther. Steel continues to be reused. Concrete, gypsum, and wood can't really be used any more at that point. It only takes 20% of the energy needed to make steel to recycle it. (Steel companies should use this statistic to promote themselves.) In conclusion, steel is the most energy efficient material, but only after a very long time full of recycling. Wood is the most energy efficient for immediate use, but has limited reuse.
  • Infrastructure is everything. You cannot place a sustainable building in an unsustainable area and get the desired results. However, if the area is sustainable, the buildings on it become more sustainable by default. The key here is to revitalize the core of town. Discourage sprawl.
  • Nighttime energy is wasted. Electric companies have to produce enough energy to cover everyone, always producing more than needed so electricity is readily available. The leftover, unused energy (which is there is always more of at night) could be stored as hydrogen (which is a battery, not a creator of energy, a common misconception.)
  • Masonry stoves are amazing. I want one.

Ed also suggested many small, simple ideas that could be included in building design - creating passive vacuums that keep air circulating, light up high ceilings using a strong beam on the floor to avoid changing high-up bulbs, put a heat exchanger around the shower drain pipe to preheat incoming water, etc. Small, interesting things. I'm definitely keeping these notes for future projects.

Saturday, June 20, 2009

Green Development Best Practices Notes

A large update will happen tomorrow, but for now I will say that I have been in class for the last three days, it was fascinating at times and TOO in depth at times, but I got several pages of notes that you can click on the pictures of if you are interested in reading. I'll write a better summary of the class tomorrow.


Tuesday, June 16, 2009

Window Sills and Giggly Interns

This morning was dedicated to folding fliers for the summer lecture series. There were six people in the room, working in teams of three. One person folded, one put tape and a stamp on and the last put the to and from mailing address stickers and stamps on. There were a thousand fliers being sent to Vermont residents. It was a fun, chatty time.

Karie, Tim (2) and (work trading) Ryan working as a part of the three-person team.


Ryan and I worked on the window-sill that we started yesterday. (There's a garden shed that one of the classes built that needs some finishing work before we take it to it's final destination off campus.) Yesterday, I was having the worst time trying to come up with dimensions and plans for the window jams and sill. (Especially since the terms were new to me. Rough openings were the most confusing part, it seemed.)


Ryan worked on cutting and marking the sill.

I made the jams. The windows fit fabulously.

This evening, the interns and I went up to Sunset Rock and watched the sun set over New York and Lake Champlain. It was a beautiful hike and a great time.

Random Notes

I have a list forming on the top of my page of morning meeting notes of things to blog about. It's getting longer than I'd like for it to be, so here, I will take care of that list.

Chicken Meeting
On the 11th, the interns had an official meeting to discuss chicken duties. We had all been so psyched about getting the hens that we never really designated who was responsible for them. They are pretty easy to tend to, but the meeting helped to clarify who specifically was in charge. We decided that most tasks can be completed by the first person to notice they need doing (like letting the chickens out in the morning, giving them fresh food and water, etc.) Whoever is in charge of morning meetings gets to make sure that the chickens are let into their tractor in the morning and whoever is on dish duty gets to make sure they are tucked away at night with food and water. Whoever has office duty on the weekend is in charge, and gets to clean the coop. Every Monday, after our morning meeting, we will move the coop/tractor. (We actually forgot yesterday - not habit yet. We moved it today.)

Class Switching
There have been quite a few weekend and non-NBI classes coming in. It's odd to see the unfamiliar faces. There are still some core class members sticking around to finish up their requirements for their certificates in sustainable building and design. It's a truly unique social situation - developing great friendships with all the NBI kids, but also trying to be as friendly and open as possible with people that are only staying for a weekend or so.

Also, interns do quite a bit to prepare for classes. There was a major class switch after the core class ended, with some extremely rushed cleaning of the studio. We have to pay close attention to which classes are starting soon, find out the needs of the instructors and get everything ready.

Mower Vs. Weed-whacker
When given the option, use the mower. The weed-whacker is two-cycle, which means that the oil and gas are mixed, and both are being burnt in the process. The mower is four-cycle, which means that the oil and gas are in separate tanks, the oil being cycled and reused. Not as much pollution from burning oil.

Sunday, June 14, 2009

Frame-raising with NBI

I think the date on my last post was off. I had started writing it on Wednesday, but it was finished on Thursday. So pretend like Thursday was the last entry.

Friday was another day of landscaping. Nothing highly remarkable, except that I don't believe that weed-whacking the cracks of a paved parking lot is a worthy way to spend time.

I've spent a lot of time in the kitchen with Heidi lately. A few of the NBI boys and I hung out with her late on Friday to help her prepare for yesterday's dinner - serving about 75 people (board members, families and people coming for a slideshow presentation.) We get a lot of prep work done so that yesterday could go as smoothly as possible for her. (I also helped her during the day on Friday. Not just landscaping.)

Yesterday, I went with the NBI class (Natural Building Intensive, as a reminder) to raise the timber-frame that they had been preparing all week. The NBI class will be here for a total of 13 weeks - we'll be leaving around the same time. Their class project is a jam-type studio/garage for a family in Warren. Lots of pictures!


Chelsea Green Publishing Company is making/supporting a documentary about the class and their project.

When we got out to the site, the concrete foundation had just set. The timbers were marked, cut and waiting on us. (If you look beside Dan and the scaffolding, you'll see some orange pipes under a sawhorse - those are the connections for the radiant heating. We had to be careful not to knock them. If one of those tubes busts below the concrete, there's just about no way to fix it. I don't like this about radiant.)

The class preparing to set up the first bent. They had connected all the pieces, pegged them into place and were receiving some last minute safety instruction reminders.

First bent up.

There are two levels of concrete - one side is about two inches shorter than the other. The lower level is the garage. The upper level is the studio. They were treated differently when it came to protecting the beams from water.

The studio area, which will have more protection from natural elements, has flashing attached to the bottom of each post. We found as we raised the posts that the flashing needed some extra nails to keep from crumpling. (Here, Nick repairs crumpled flashing.)

The area in the garage needed more protection, so an entire two-by went under it. Theoretically, this will keep the post from absorbing moisture from the concrete, which would cause warping.

When we set up the second bent, we noticed that the middle post wasn't quite flush with the ground, but decided that it was just a settling issue. Nobody payed much attention to it.

However, when it came time to put the first beam up (attaching the first three bents), we could not get the pieces to fit.

We worked on it for about half an hour before we figured out that one of the side posts from the second bent was about an inch too tall. So it all had to come back down.


Josh, the instructor, sawed the bottom portion off. It was thin, but enough to make a difference. A good reminder why it's important to measure twice. (At least it wasn't too short.)

When we tried the second time, , after the trimming, the piece fit perfectly.

Around noon, the excavator came to the site to help get the heavy timbers onto the posts.
This was much easier than using a bobcat.

The operator was a little concerned about reaching his crane so far away from the machine with such a heavy log, so students stood in his bucket (opposite the crane) to provide some counterweight.

The brothers (good guys) and the first tractor-raised beam.

The second beam, going up.
Skip, one of the instructors, helping to line up the second beam. (For the record, the mortise is the hole, the tenon is the peg.)

The second set of beams was a little trickier to set up. The connection between the two beams had to be set at a certain angle that didn't work very well with the angle that the brace needed. There was a lot of teamwork required for this one, as well as strong leadership.

After a while, however, the group got on a roll, leading themselves and working together well.

So good, in fact, that the instructors sat back and watched. I sat with them for a while - it was just the class working. The instructors were watching and yelling every once in a while for a student to watch their fingers, but mostly chuckling as the students figured out how to piece the building by themselves.

They jumped in where instruction was needed.

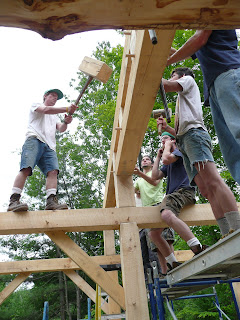
The last beam was a snug fit. It needed some "convincing" with the giant mallet. There was much rejoicing once complete.

And picture-taking with the finished frame.

The finished frame.

At the end of the day, the instructors presented the class with a cooler of beer, joined together and sang. It was a smooth, good day.